In a perfect world, your brother/sister/mother/child would be a professional photographer who owed you a favour. You’d have them take beautiful head shots of you and your employees for FREE, which you’d then toss on your recently redesigned website for the world to see.
Alas, we live in an imperfect world.
But do not fret! This doesn’t mean you have to settle for crappy head shots on your website. Budget and time constraints often lead our smaller clients to taking a DIY approach to head shots for their websites, and you know what? That’s ok. While we encourage everyone to seek out a professional photographer to take brilliant portraits of their team, we understand that sometimes you just need to get images of your staff on your website as quickly as possible. And sometimes, the only decent camera you have kicking around is the one nestled inside your trusty iPhone (or Galaxy Note, if you swing that way).
We’ve compiled a few handy tips on how to take a decent head shot with your phone — follow these and you will end up with A++ images you’ll be proud to use to grow your business.
Have someone else take your photo
Although there are plenty of people on Instagram who have mastered the “art of the selfie”, we suggest having a friend or colleague take your headshot — the result is much more professional. (Plus, the front-facing camera on your phone takes lower resolution images.)
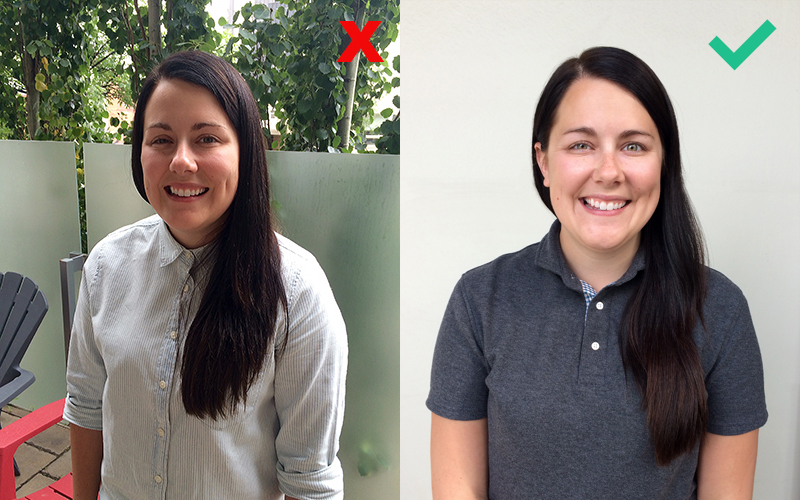
Use a neutral background
Choosing a neutral background — a plain or brick wall, a fence, even some simple greenery — will keep the focus on you. Watch out for objects in the background that might end up looking like they’re sticking out of your head.
Use even lighting
Probably the most important tip we can give you! If you’re outdoors, find a nice shaded spot to have your photo taken. Being photographed in direct sunlight creates bright highlights and heavy shadows on a person’s face, which isn’t very flattering. Overcast days are the best for shooting outdoors, because the light is very even. If your photo has to be taken indoors, try to find a spot that is lit with natural lighting (from a window).

Stand out!
Wear clothing that contrasts with your chosen background — no one wants to blend in with a grey wall! To look natural, wear the kind of outfit that you would normally wear to work. Dressing up in a tux is not necessary.
Pick a style and stick to it
Brand consistency is important — and the same is true for your headshots. Pick a style and stick to it! Don’t worry, this doesn’t mean making everyone stand in the exact same pose wearing the exact same thing, unless maybe your small business is a summer camp. Making little things consistent is important, such as using the same (or similar type of) background and shooting everyone at the same time of day (to match lighting). By doing this, you ensure each of your team members’ images look like they came from the same place.

VOGUE. (Just kidding — strike a casual pose.)
Try and stand in a way that is relaxed, with your body angled slightly away from the camera. Fold your arms, have your hands on your hips, or put your hands in your pockets — whatever feels most natural. Remember to keep your shoulders back and your chin up.
Hold your phone steady
Make sure the photographer keeps the phone as still as they can by using both hands, and keeping their elbows tucked into their sides for support. (Breath normally — don’t let the pressure of being a photographer cause you to hyperventilate.)
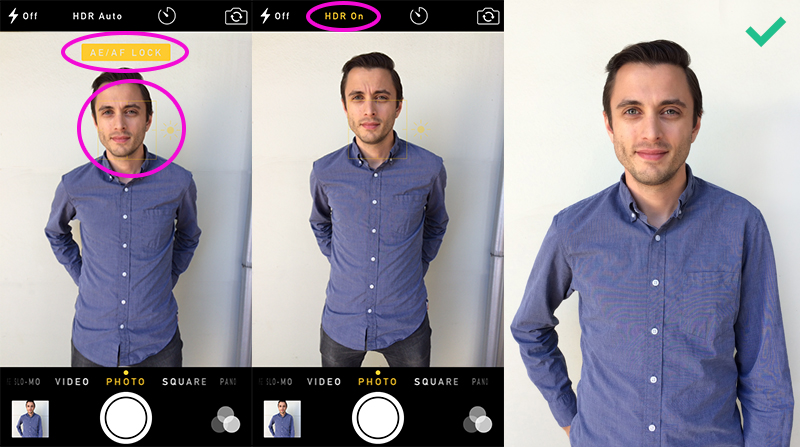
Use HDR mode
HDR is a mode of shooting that combines several exposures to create a single picture with more detail and a greater range of tones and colours. If your phone’s camera has it available, please use it.

Lock the auto-focus
Tap (or hold, depending on your phone) the screen where you want the camera to focus — the face — to lock the focus and keep the image sharp.
Give your head some space
Remember to leave space around your head and shoulders — the image can always be cropped tighter later if necessary. Don’t worry about including the lower torso and legs — this is a headshot, after all!
Don’t use digital zoom
Digital zoom lowers the resolution (and therefore quality) of an image. Have the person taking your photo step closer to you instead.
Shoot away!
The beauty of digital cameras (including phone cameras) is that you can take as many pictures as you want until you get the right one. Don’t be afraid to take a few — you can always delete (or meme) the ones that don’t work out!

That’s all there is to it! We wish you the best of luck with your DIY head shots. When you’re ready to get some professional portraits taken, get in touch — we can recommend some awesome photographers.
Thanks you, I enjoyed this article Emma 🙂 Good tips
Thanks Andy, I hope you can use some of these tips in the future.
Clever and to the point… And it’s how to succeed in life ???? use what you have and measure it kick ass. But my tip is… Diagonal! Shoulders one way, face the other and do not shoot straight in front of anything if you can
Cheers! “Diagonal posing” is a great tip too — angles are key, so thanks for sharing.
Diagonal Posing it is!! Thanks for the tip!!
You’re welcome! Have fun with your shots.
Really good tips thanks. I hope to implement them for my new LinkedIn profile photo.
Glad you found it helpful — I hope you end up with a stunning LinkedIn image!
Stunning models throughout this article.
We only hire the best.
[…] Butler offers tips on how to take a decent head shot with your […]
Sharing this out on LinkedIn!
2 cents: Where are the Social Media Sharing buttons on your site?!
We’ve had them in the past, and they were widely unused. They slow things down, and since we removed them we have seen a significant increase in comments on blog posts. Thanks for sharing on LinkedIn, Jerry!
Dear Emma,
Thanks for this valuable and very informative post…I’ll try this DIY!Keep posting..
You’re welcome, I hope you end up with some solid results!
Great advice, I want to try all of these.
Go for it — there’s no such thing as taking too many photos, so keep shooting until you end up with a winner!
Tomorrow, I am taking headshot pictures for my friend and I am a bit nervous about doing that since I don’t have any camera equipment. Yet, I do have a phone and so I am hoping that I can use your tips to help my friend come up with the best photos. I especially like your point on not using direct lighting. In the past when I have used a camera, I have always done pictures closer to a window for the effect of natural lighting. One of the tricks that I also used was to move my hand around to test out where the lighting was best. I’ll probably play around with the lighting when I’m taking the pictures with my phone as well.
Awesome Faylinn! Natural lighting is the way to go. It sounds like you already have a good handle on how to approach taking headshots on a phone — hopefully these tips help you nail that shoot tomorrow!
Yes! Thank you! This is perfect to send to our partners who think .5kb images taken in the dark on a 1995 computer cam are just fine.
Haha I hear you — hopefully these pointers help!
[…] Taking a decent headshot with your phone. […]
Nice
Thanks for these tips. Lighting can be really tricky to get right.
I agree about standing in shade, but I’d also say make sure the background isn’t too bright (e.g. because it’s sunlit) or the person might come out underexposed. (I must say, my 1st reaction was that a plain background and even lighting can make for a boring shot! But then I realised they’re the safest bet for decent results.)
Great tips about contrasting with the background, and taking several shots – not things many people think of!
I did a makeover of a headshot for use on a speaker-bio PowerPoint slide. Would love to hear what you think.
Cheers for sharing your thoughts — it’s always imperative to be aware of not under(or over)exposing any image. I took at look at your PowerPoint slide headshot makeover, and the “after” is definitely an improvement, nice one!
While I’d love to get a professional head shot done, it looks like taking one on my phone could be a great option as well! I’ll have to keep the lighting tips in mind, because I find that’s something I struggle with when taking photos. Thanks for sharing!
You’re welcome! Lighting can be tricky, but if you take the time to get it right it’s often the major difference between an amateur or a more professional looking shot.
[…] there is no need to shell out hundreds of dollars for professional photos. You actually can take a professional-looking headshot on your […]
This was an awesome and helpful article. Thank you very much for sharing..
You’re very welcome!
[…] camera phone and good lighting can do wonders. Just make sure someone else takes it! Here are some great tips for mastering the DIY […]
Thanks for this valuable and very informative post!!
No problem, hope you found the tips useful!
nice sharing!! thanks for this helpful post. great ideas.
You’re welcome, hope they come in handy for you!
Really appreciate you sharing this post. Great info!
Thank you all for the comments and tips. Have a wonderful day!!